Building Accessible PDF Forms
Continue to main contentQuestions to Consider
When you are preparing to build a form for use on the web, you need to ask yourself:
Is it a PDF or a web form?
Whenever and wherever possible, web forms are the best possible option for accessibility and ease of use to all users. They have a few distinct advantages that a fillable PDF form may lack. Such as:
- Configurable to submit to specific people based on answers
- Entries can be printed out
- Entries can be download and organized in a spreadsheet format
- They are easily accessed with the keyboard
- It is easier to prevent entry errors
We understand there are quite a few use cases across the site where the option of an embedded web form is not available, such as when you need an ink signature from the submitter or a state regulation. In these cases, forms need to be just as accessible to someone who must use speech to text or a keyboard to complete the form as they are to someone who can print and fill the form out by hand.
Adobe Acrobat Pro DC is the program required to create these types of PDF forms. If you do not currently have a license on a computer in your department or office, please contact Information Technology about getting one.
We have provided instructions below, or if you prefer you can use Adobe's tutorial.
Making an Interactive/Fillable PDF Form
Step 1 – Adobe Acrobat Pro DC
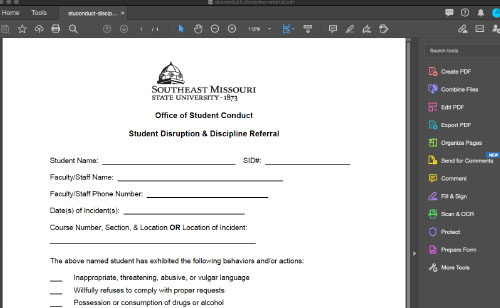
Begin by opening your form document in Adobe Acrobat. Adobe Reader will not be able to perform this task for you. If you do not have Acrobat Pro DC available to you, contact IT about a license.
Step 2 – Prepare Your Form
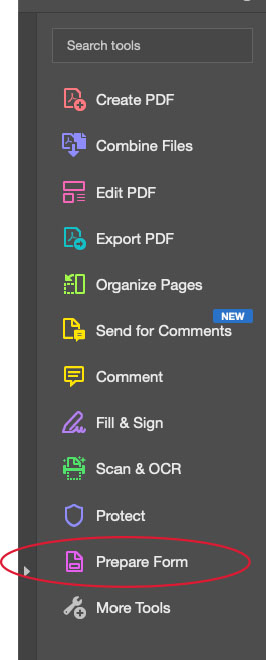
In the toolbar on the right hand side of the Acrobat window, select "Prepare Form." If "Prepare Form" is not available, click "More Tools" at the bottom of the tool list.
Step 3 – If “Prepare Form” is Missing From the Toolbar
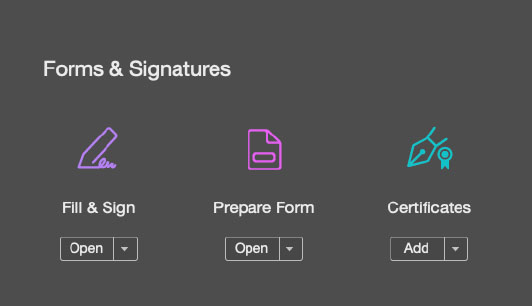
Scroll down to the "Forms & Signatures" section underneath "Prepare Form" and click "Add." This option will now appear in your tool list located on the right-hand side of the Acrobat window.
Step 4 – Choose Your Document
You'll be asked to choose a document to start. Since you already have your document open, it will present the open document as the main option. Click "Start."
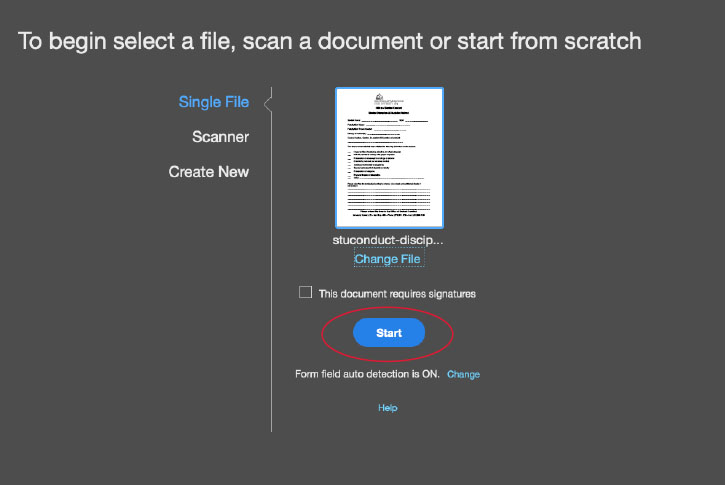
Step 5 – Beginning the Process
Acrobat will begin the process for you. From here you still have some editing to do to make sure your fields are all labeled properly. Acrobat will identify places that should be a form entry, such as boxes or long underlines, and create form fields for you. Now, we edit.
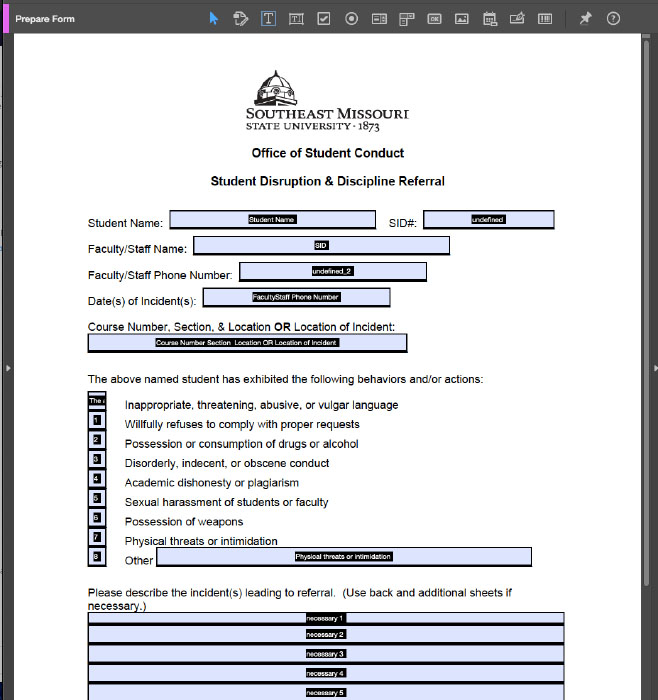
Step 6 – Titling Fields and Adding Tool Tips
Clicking each form field will bring up a dialog box, shown at left. You'll want to make sure the title of the box is appropriate (This one is, but the one next to it, SID, is not) and add a helpful tool tip, such as "Enter student name."
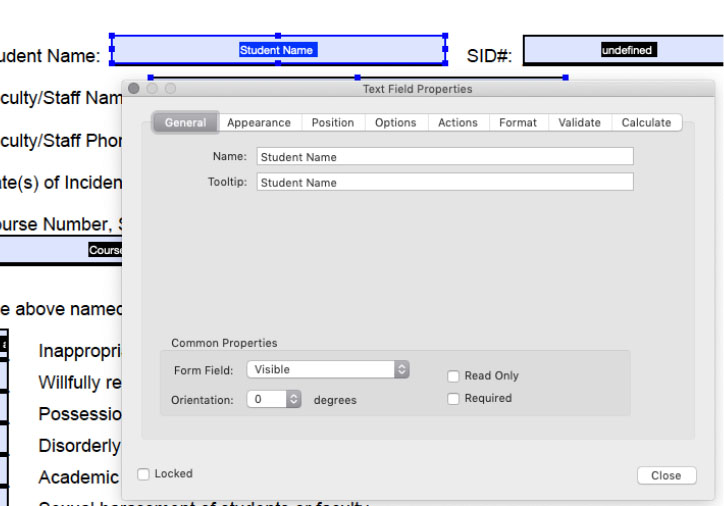
Step 7 – Defining Form Fields
Never leave a form field undefined, as shown with the SID box to the left. The title and tool tip need updated. We'll change them to Student ID and ”Enter student ID number.”
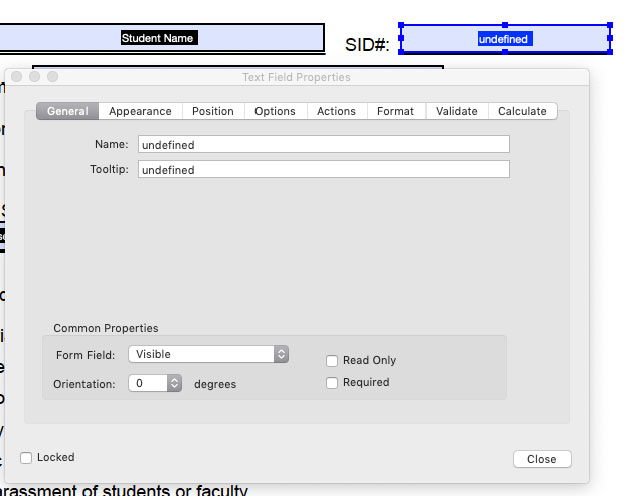
H3: Step 8 – Adjusting Checkbox Lists
We will also need to fix this list, which would work best as checkboxes instead of text entries. To fix this, we will use the toolbar at the top of the window.
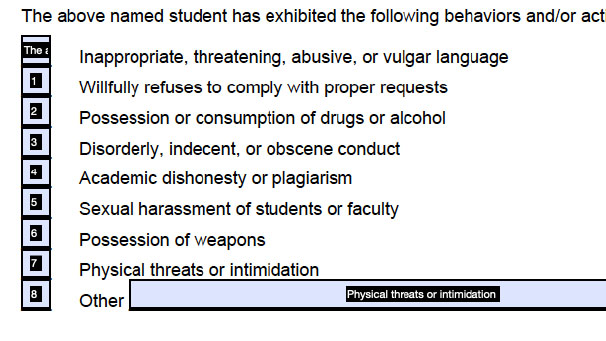
Step 9 – Deleting Form Fields
First, select each text box and delete them. We will also have to update the order of our checkboxes once they've been entered.
Step 10 – Adding Checkboxes
Our "Prepare Form" toolbar located at the top of the window above document space is where we can edit text, add form fields, etc. To add checkboxes, select the checkbox icon.
Note: There are many options to choose from to build your form. If you hover over an item, a helpful tool tip will appear, explaining the tool function. There are radio buttons, dropdown list options, print buttons, and more you can add. Explore them!

Step 11 – Adding Checkboxes (continued)
With our old text boxes deleted and our checkbox item in the toolbar selected, we’ll begin adding the checkboxes. To add a checkbox, hover over the area you want to drop the checkbox and click. The box will drop into place and the field name box will appear - be sure to properly name this field! In this instance, we have used the text to the right of the checkmark area to label it. You’ll have to repeat this for each check item.
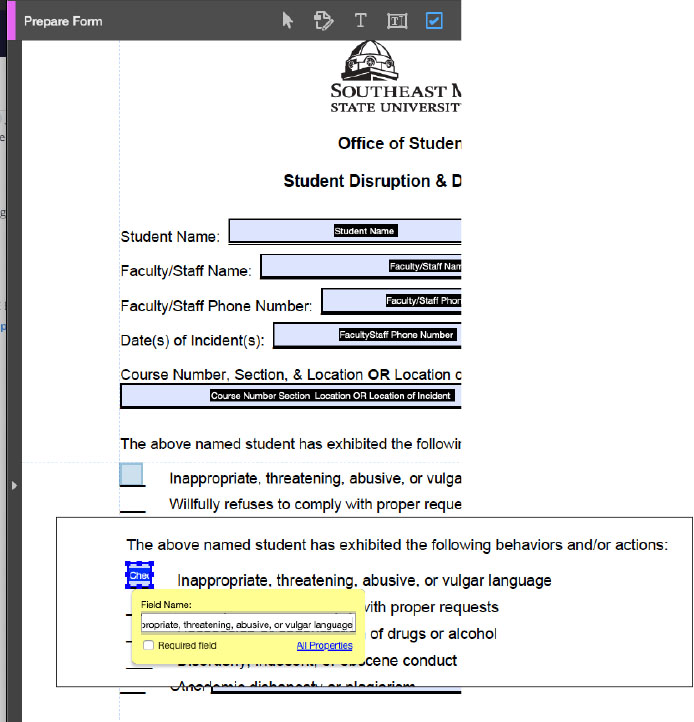
Step 12 – Reordering
Select multiple checkboxes by holding Ctrl (on Windows) or Cmd (on a Mac) and clicking each one. Then, drag and drop them back into the correct order on the list.
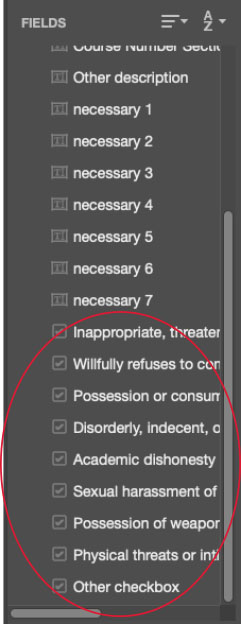
Step 13 – Editing Text
Here we’ll be editing text within the PDF to create a cleaner text box. Select each entry box and delete it.
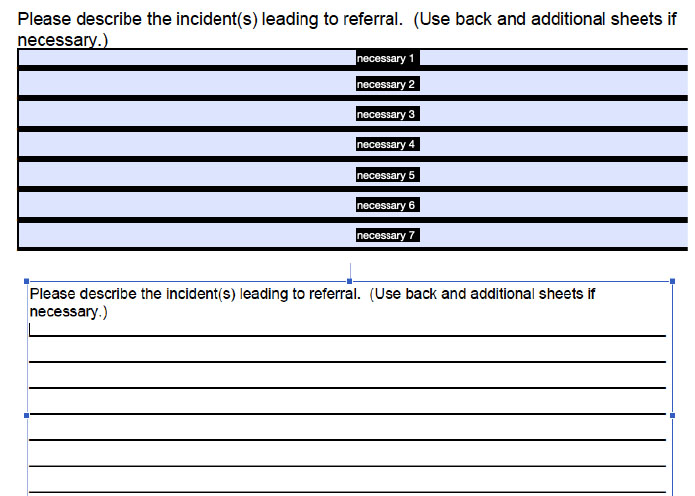
Step 14 – Editing Text (continued)
Next, click within the text area where the lines are, and delete them all. This will raise the footer, but you can hit ”Enter” a few times to create your box space.
Now you have a blank space for a paragraph text box.
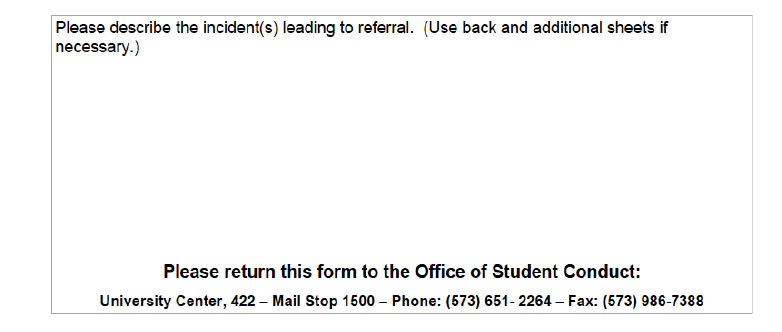
Step 15 – Adding a Text Box
Using the “Prepare Forms” toolbar, select the “Text Box” option, circled, to create the text box we’ll use for the form entry.

Step 16 – Adding a Text Box (continued)
It will drop in the same way the checkboxes did. Be sure to give your field an adequate name.

Step 17 - Resizing the Text Box
To make this box bigger, click and drag on of the dots (handles) and pull it to an appropriate size.
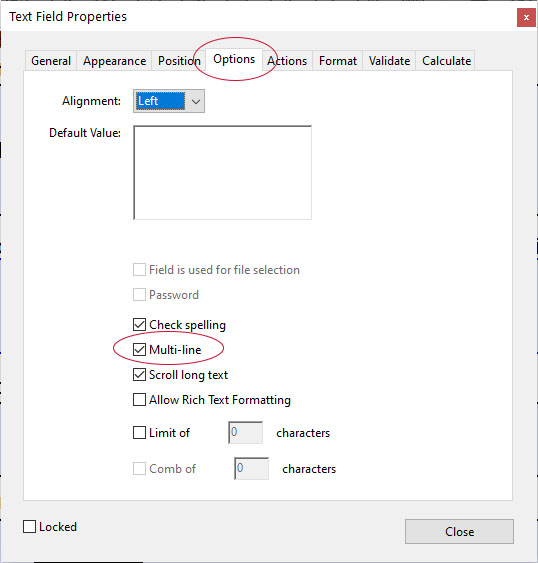
Once you have made the box the size you want, right-click to open the "Properties" dialog and select the "Options" tab, then check the "Multi-line" box.
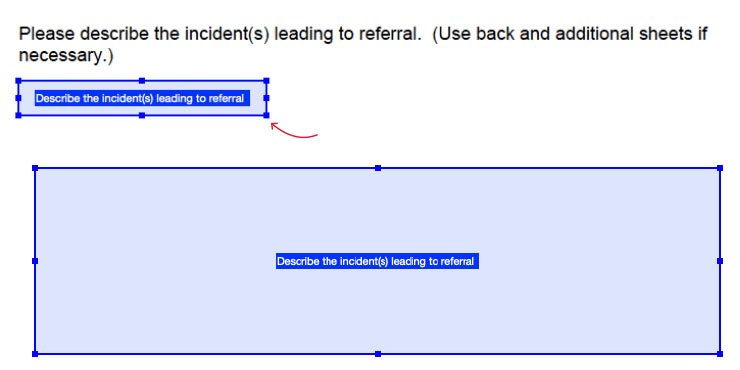
And Done!
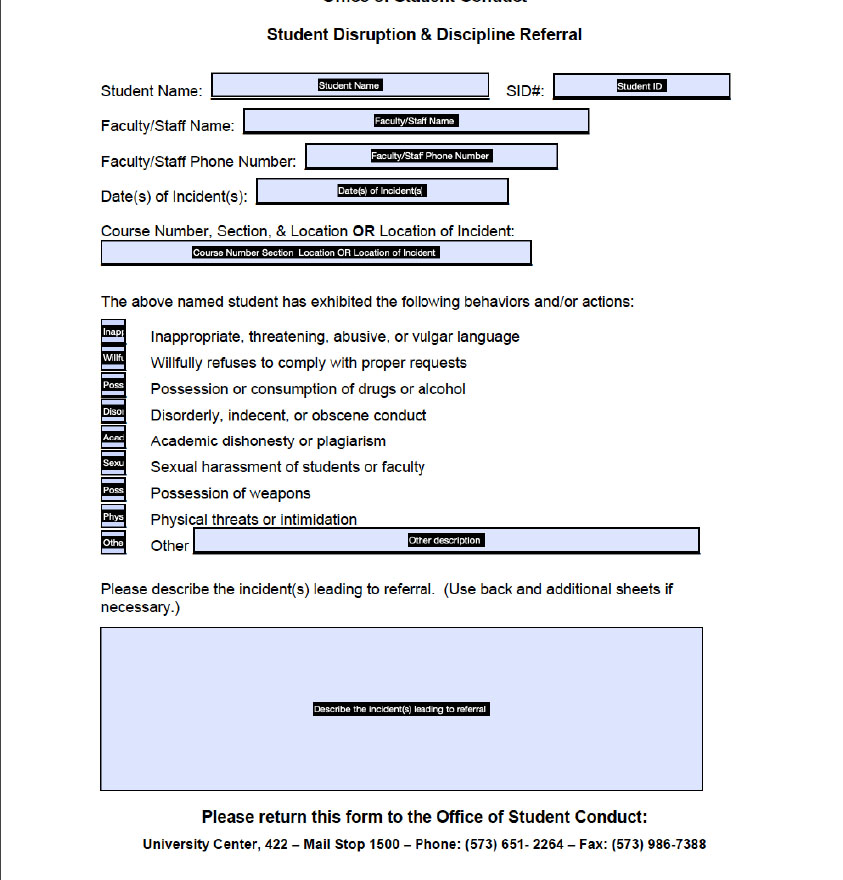
Our form is now complete with properly named fields, the appropriate fields used in the correct places, and our field lists in the right order. You can now save this form and use it online.
