Workshops
Continue to main contentThe Marketing and Communications team has decades of experience working within brands and planning successful marketing campaigns. Because we know there’s much work to do and sometimes you have projects you just need to do yourself, we offer a variety of workshops and resources to help you. Let’s do this.
Upcoming Trainings
-
Brand Camp
Brand Camp is a series of workshops to help you become familiar with the Southeast brand, understand how to apply it, and actively work on leveraging a brand strategy for your program and goals.
Upon completion of these trainings you'll be able to:
- Understand why we have a brand and why it matters
- Identify ways to amplify the University's impact through our brand
- Know the basic guidelines for creating messaging and designing within brand guidelines
Sign up for Brand Training.
-
Social Media 101
You’ve just inherited your department’s social media. It isn’t the same as those food and latte photos you’re posting on your own Instagram. We’ll walk you through branding basics, best practices, insights, and all you need to know to reach influencer status. When you leave these social media trainings, you'll be able to:
- Create quality, on-brand content.
- Curate a page that resonates with your current audience.
- Analyze your social media data to help you make better social media decisions.
-
Web Editor Workshop
It takes a village, or in this case a campus, to keep semo.edu up-to-date with the latest information to keep our students and prospective students informed. But before you edit, you need to know the system and understand the web standards and accessibility requirements.
On completion of web training, faculty and staff should be able to:
- Understand and apply how to make content updates
- Demonstrate the ability to apply ADA standards
- Identify and develop ways to improve their page search engine optimization
- Registration is required 48 hours in advance


Accessibility Resources
Consider for a moment that you need to find information online but without your sight. It’s important to remember we have more than just sighted, hearing, and individuals with full use of their hands browsing our site and they may be using assistive technology. This technology includes screen readers that read aloud web pages for people who cannot read the text, screen magnifiers for people with some types of low vision, and voice recognition software and selection switches for people who cannot use a keyboard or mouse.
Information included on semo.edu must follow accessibility guidelines, and that includes documents linked online. It is important to make any PDF file on our website accessible to disabled individuals because:
- It’s the law.
- It’s the right thing to do.
Accessible PDFs begin with properly constructed Word documents. It’s simple to make your Word doc as accessible as possible, and ways to export them as PDFs to preserve the accessibility created in your base document.
Creating Accessible Documents in Microsoft Word
Step 1 - Use Proper Headings
Headings are not just a design aesthetic in your document. A proper heading structure gives everyone an understanding of how a document is organized. Screen readers and Braille users can navigate sections by jumping from heading to heading. Non-handicapped readers can also use them to skim for the information they need.
Headings are not just an enlarging or bolding of text. In Microsoft Word, there are built-in heading styles that must be used. Headings should also form an outline structure in their use. Use “Heading 1” as the style for the main heading of your document and “Heading 2” as sub-headings. If additional levels of headings are required for your document, use “Heading 3”, “Heading 4”, and so on, as needed.

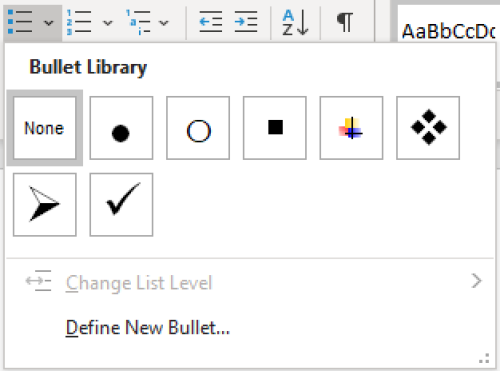
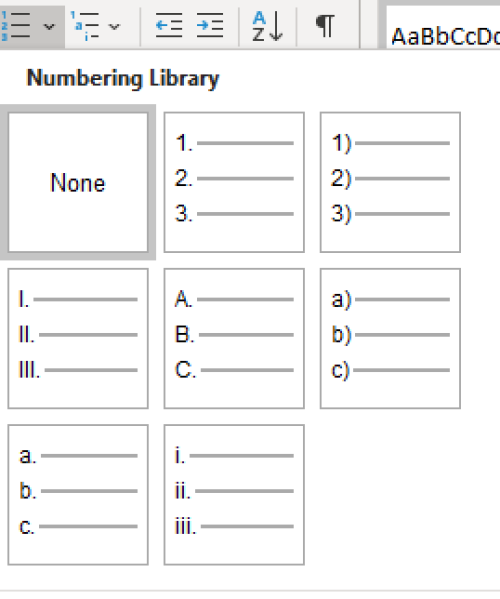
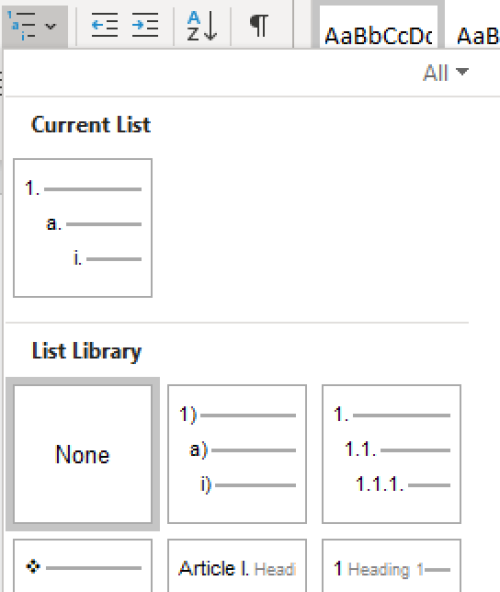
Step 2 - Use Lists
Lists help break up large blocks of information into more easily digestible pieces. When creating a list in Word, using the built in “List” tool is required. Construction of a list any other way is not really a list, which means that the content is more difficult for screen readers to understand.

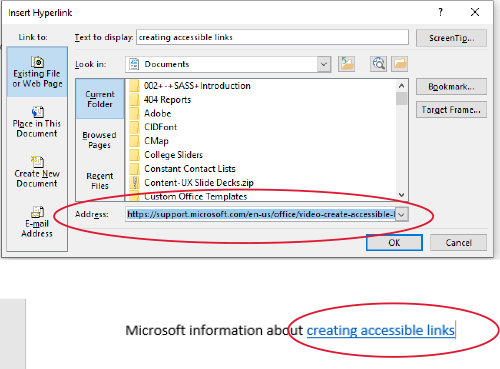
Step 3 - Use Meaningful Hyperlinks
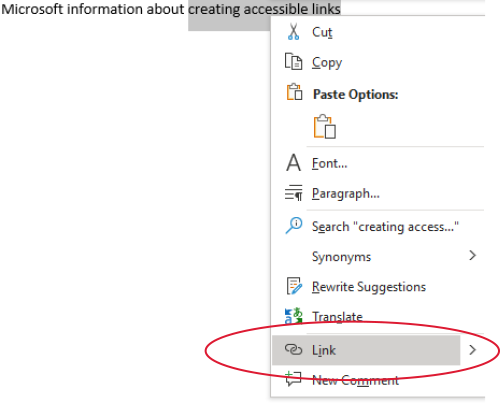
“Click here” and a URL copy-pasted straight into the Word document are not meaningful hyperlinks.
Be sure to use language that conveys relevant information about the destination of the link. Highlight that text and right click (or Ctrl+Click on macOS). A dialog will pop up; select “Hyperlink”, include the URL in the “Address” field and click “OK” to insert your link.
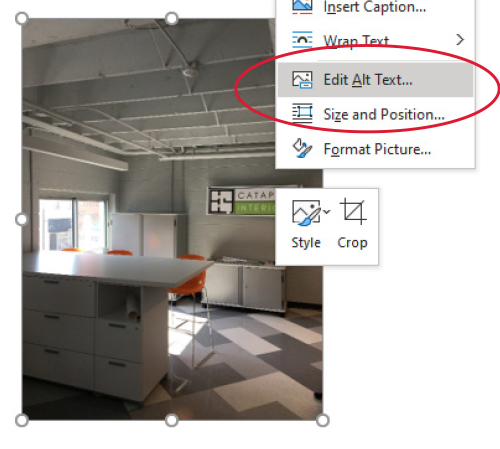
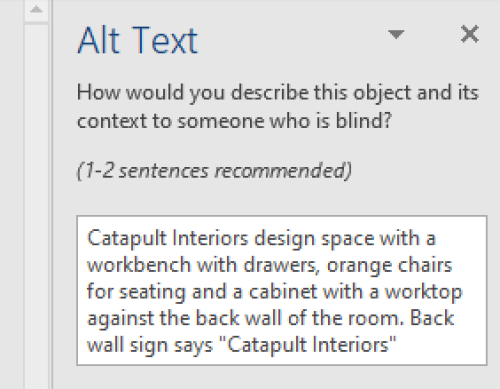
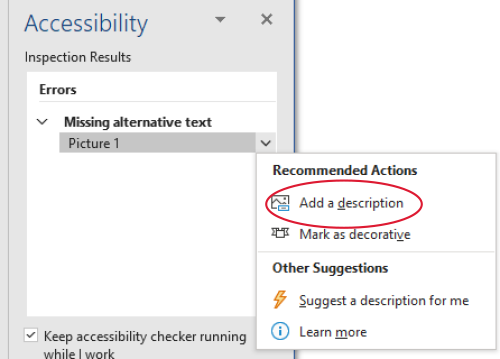
Step 4 - Add Alternate Text for Images
If you are inserting a photo into your Word document, you must include an Alternate “Alt” Text description. Avoid using descriptions such as “Photo of” or “Picture of.” Describe the image in brief. If your image includes any text, all of that text must be included. It is best to avoid pictures or images of text.
In Word, right clicking or (ctrl+click in macOS) will bring up a menu; select “Edit Alt Text.” A new panel will open to the right of your document where you may enter your description.
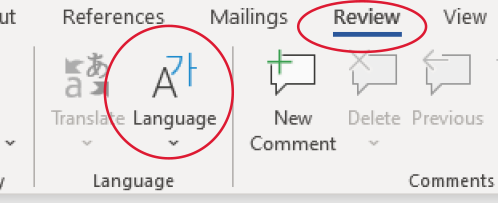
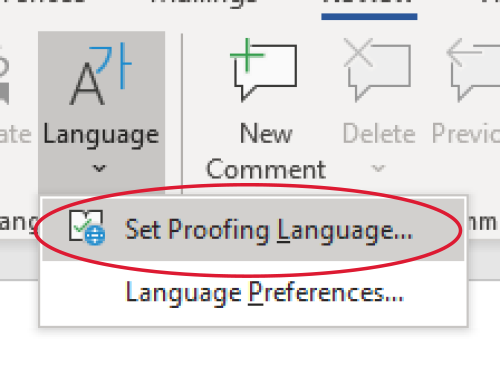
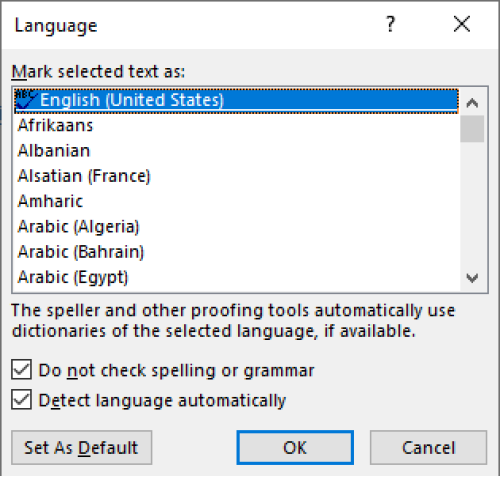
Step 5 - Set Your Document Language
Word will often automatically identify what language you are writing in, but to keep it accessible, you should make sure to set your document language. This can be found under “Review” in the application ribbon. Select “Language” and click “Set Proofing Language.” A dialog will pop up with a list to choose from. If you are writing in English, it may already be selected for you. Click “OK” when finished.
Step 6 - Use Tables Wisely
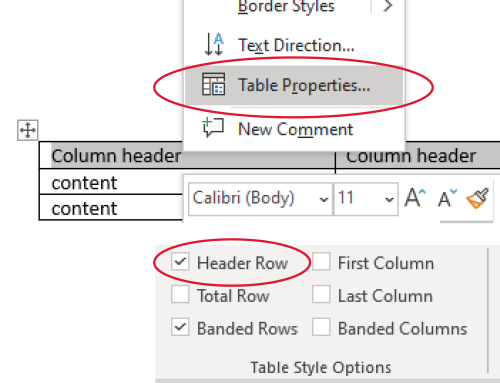
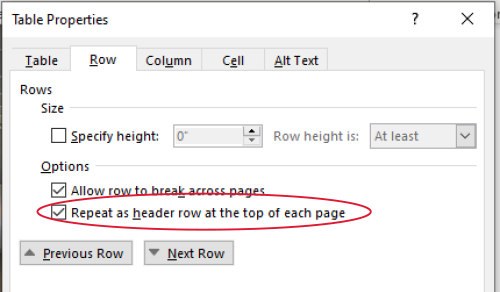
That is, sparingly. Word itself has a lot of limitations when it comes to making tables accessible. They require a specific markup that defines how all parts of the table relate to each other. If your table is more complex than a simple row of column headers and no nested rows or columns then editing the resulting PDF document in Acrobat’s accessibility checker is necessary.
For simple tables in Word, you need to set which row contains the column headers. Once you have inserted your table and selected your header row, right click (or ctrl + click on macOS) in the row and select “Table Properties” from the menu that comes up. Under the “Row” tab in the dialog, check “Repeat as header row at the top of each page” and click “OK.” In the ribbon is also a section called “Table Style Options” where you can check “Header Row.”
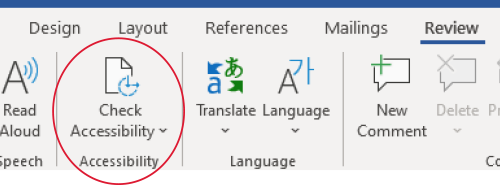
Step 7 - Use the Accessibility Checker
Word has a built-in Accessibility checker to guide you and to help double-check that you haven’t missed anything. The “Check Accessibility” tool is in the “Review” ribbon. There will be a column open to the right of your document with the inspection results. I have removed the image alt text description in order to generate an error. Expanding the error and clicking the “Down” arrow beside the item in question will bring up a menu that will allow you to go straight to the error and correct it.
Should you have no errors, the inspection results will display a green check mark and let you know no accessibility issues were found.
Creating Accessible PDFs from Micrsoft Word
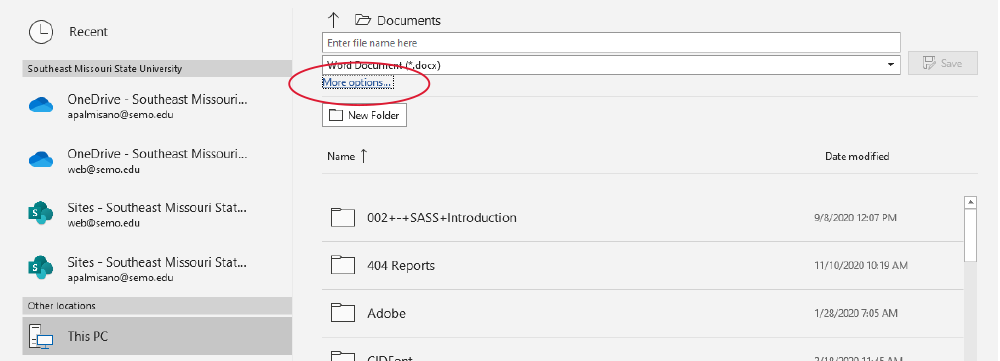
In order to preserve your document structure as you export to PDF, Word in Windows has a couple of steps. Hitting the “F12” key will bring up your “Save As” dialog, or you can click “File” and then select “Save As” from the sidebar. “F12” is the most direct route. If you use the “Save As” option in the side bar you will need to save to your PC, and beneath the file name and file type box, click “More Options” to bring up the dialog you will need.
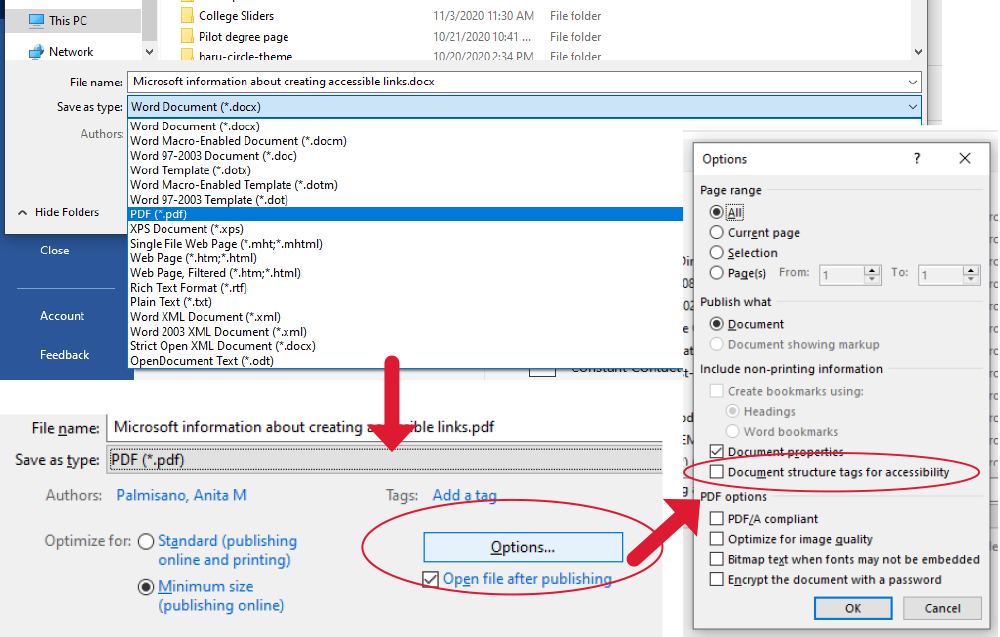
When you “Save As” be sure to select “PDF” from the “Save as type” box beneath the file name. When you choose “PDF” from this selection, a new button will show up called “Options.” Clicking “Options” will open a new dialog. Look for “Document structure tags for accessibility” and make sure that box is checked. This will preserve your alt text descriptions, table tags, and header structure when the PDF is created.
After these steps, as long as the document is simple, your resulting PDF will be accessible. These are the most basic things that you can do in order to make certain that your document is as accessible as possible to individuals who might not be able to navigate with their eyes and a mouse.
When you are preparing to build a form for use on the web, you need to ask yourself:
Is it a PDF or a web form?
Whenever and wherever possible, web forms are the best possible options for accessibility and ease of use to all users. They have a few distinct advantages that a fillable PDF form may lack. Such as:
- Configurable to submit to specific people based on answers
- Entries can be printed out
- Entries can be download and organized in a spreasheet format
- They are easily accessed with the keyboard
- They more easily prevent entry errors
We understand there are quite a few use cases across the site where the option of an embedded web form is not available. Such as the case of needing an ink signature from the submitter, or a state regulation. In these cases, forms need to be just as accessible to someone who must use speech to text or a keyboard to fill them out as they are to someone who can print them out and fill them out by hand.
Adobe Acrobat Pro DC is the program required to create these types of PDF forms. If you do not currently have a license on a computer in your department or office, please contact Information Technology about getting one.
We have provided instructions below, or if you prefer you can use Adobe's tutorial.
Making an Interactive/Fillable PDF Form
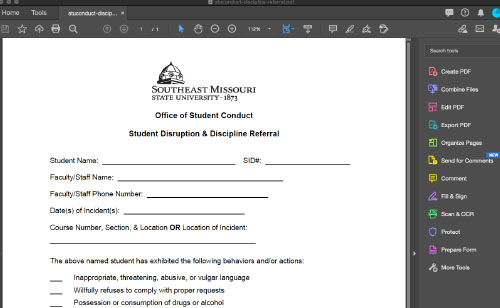
Step 1 - Adobe Acrobat Pro DC
Begin by opening your form document in Adobe Acrobat. Adobe Reader will not be able to perform this task for you. If you do not have Acrobat Pro DC available to you, contact IT about a license.
Step 2- Prepare your form
In the toolbar on the right hand side of the Acrobat window, select "Prepare Form." If "Prepare Form" is not available, click "More Tools" at the bottom of the tool list.
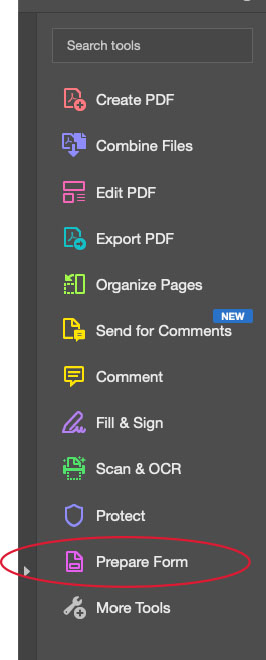
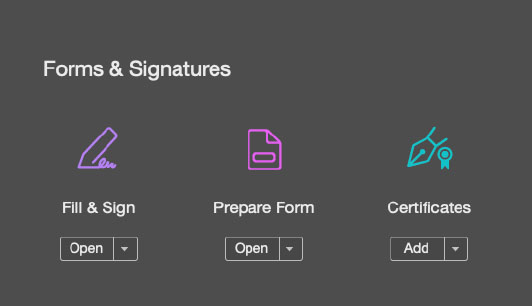
Step 3 - If "Prepare Form" is missing from the toolbar
Scroll down to the "Forms & Signatures" section underneath "Prepare Form" and click "Add." This option will now appear in your tool list located on the right-hand side of the Acrobat window.
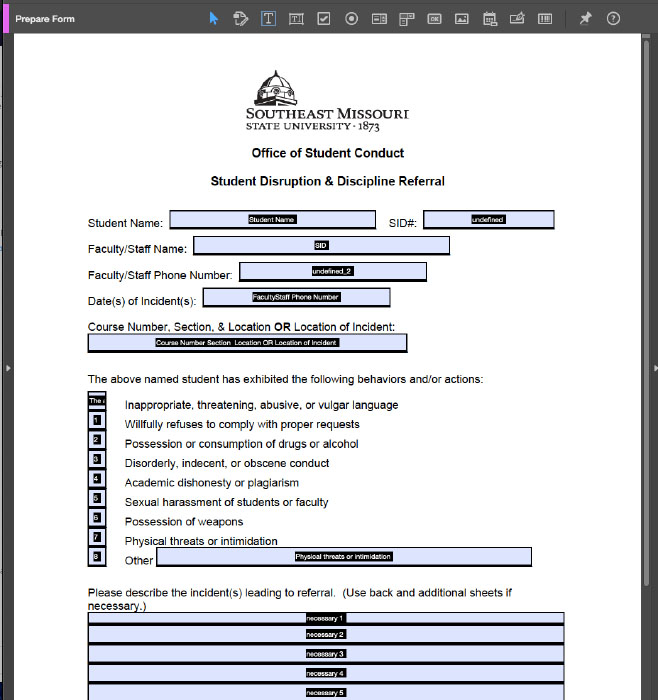
Step 4 - Choose your document
You'll be asked to choose a document to start. Since you already have your document open, it will present it as the main option. Click "Start."

Step 5 - Beginning the process
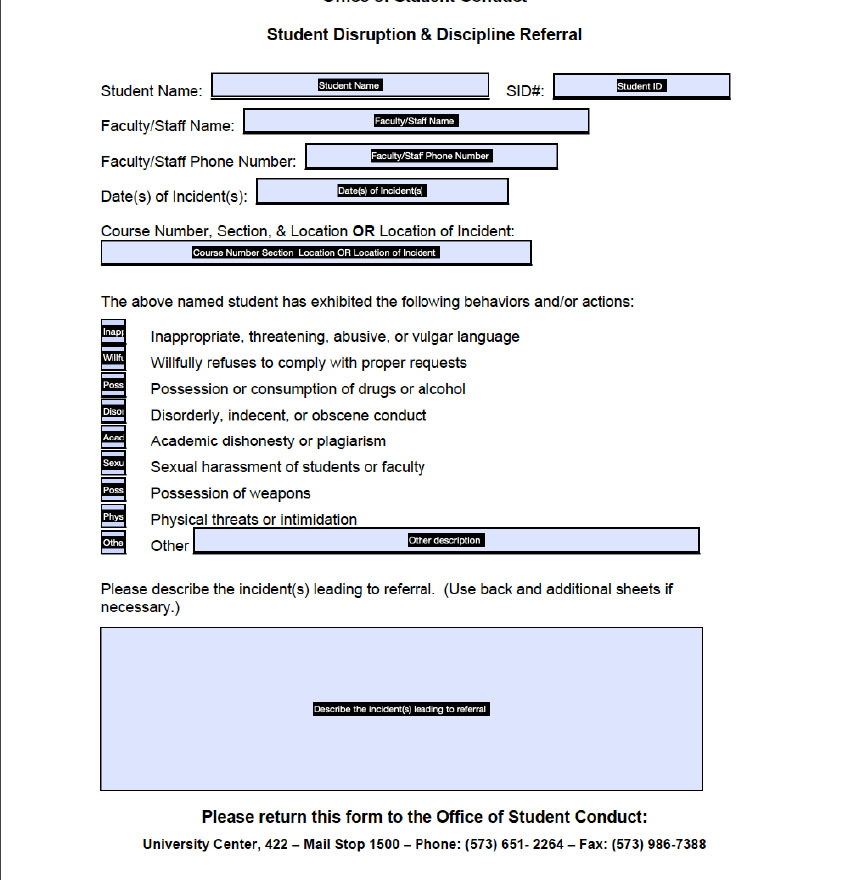
Acrobat will begin the process for you. From here you still have some editing to do to make sure your fields are all labeled properly. Acrobat will identify places that should be a form entry, such as boxes or long underlines, and create form fields for you. Now, we edit.
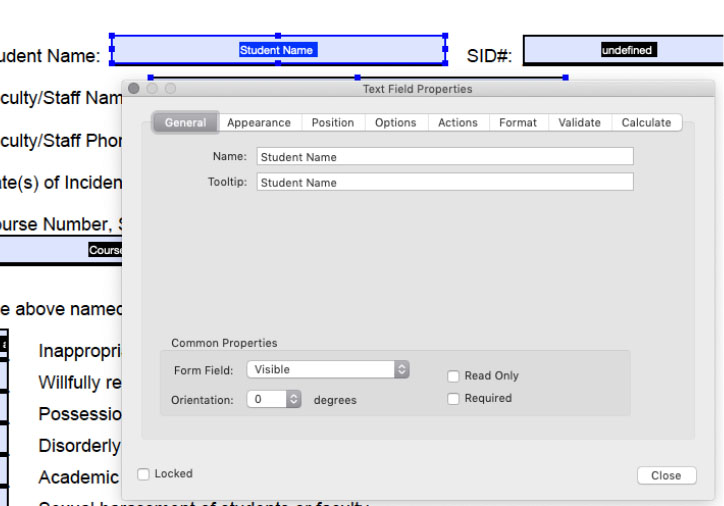
Step 6 - Titling fields and adding tool tips
Clicking each form field will bring up a dialog box, shown at left. You'll want to make sure the title of the box is appropriate (This one is, but the one next to it, SID, is not) and add a helpful tool tip, such as "Enter student name."
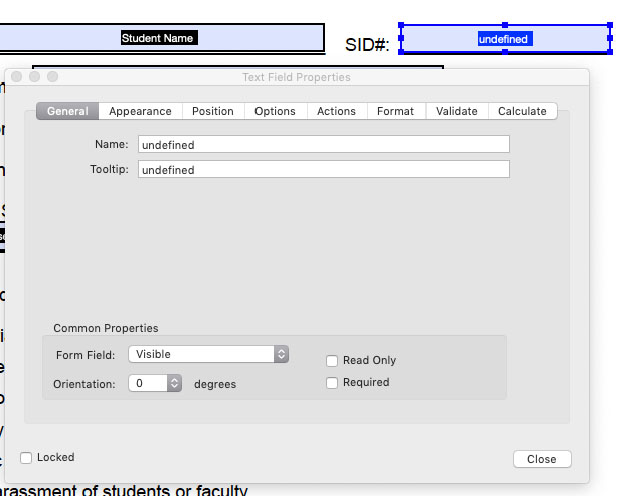
Step 7 - Defining form fields
Never leave a form field undefined, as shown with the SID box to the left. The title and tool tip need updated. We'll change them to Student ID and 'Enter student ID number.'
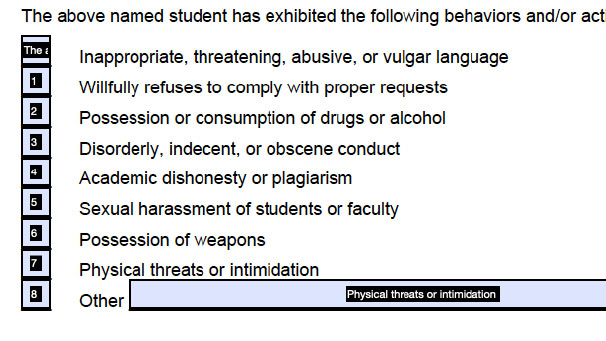
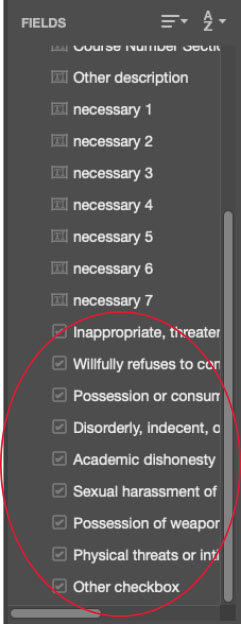
Step 8 - Adjusting checkbox lists
We will also need to fix this list, which would work best as checkboxes instead of text entries. To fix this, we will use the toolbar at the top of the window.
Step 9 - Deleting form fields
First, select each text box and delete them. We will also have to update the order of our checkboxes once they've been entered.
Step 10 - Adding checkboxes
Our "Prepare Form" toolbar located at the top of the window above document space is where we can edit text, add form fields, etc. To add checkboxes, select the checkbox icon.
Note: There are many options to choose from to build your form. If you hover over an item, a helpful tool tip will appear, explaining the tool function. There are radio buttons, dropdown list options, print buttons, and more you can add. Explore them!

Step 11 - Adding checkboxes continued
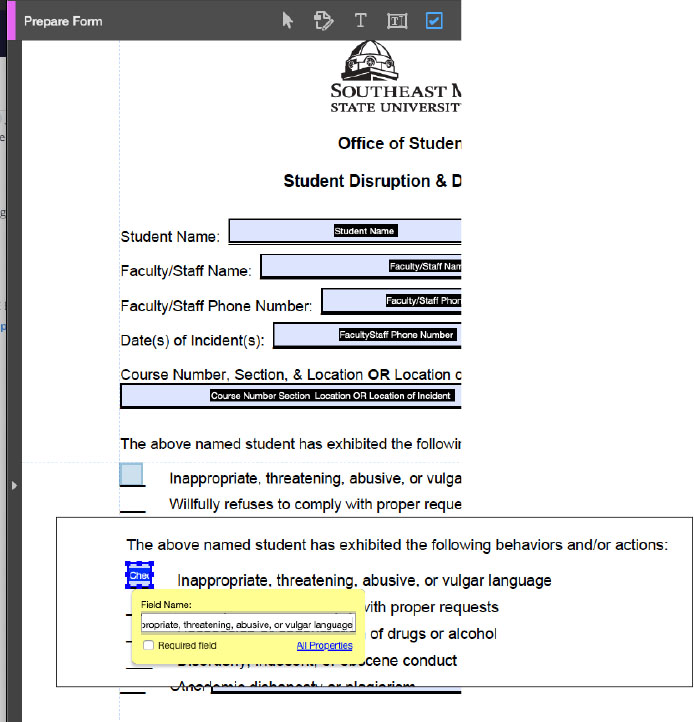
With our old text boxes deleted and our check box item in the toolbar selected, we’ll begin adding the check boxes. To add a check box, hover over the area you want to drop the check box and click. The box will drop into place and the field name box will appear - be sure to properly name this field! In this instance, I have used the text to the right of the checkmark area to label it. You’ll have to repeat this for each check item.
Step 12 - Reordering
Select multiple check boxes by holding Ctrl (on Windows) or Cmd (on a Mac) and clicking each one. Then, drag and drop them back into the correct order on the list.
Step 13 - Editing text
Here we’ll be editing text within the PDF to create a cleaner text box. Select each entry box and delete it.
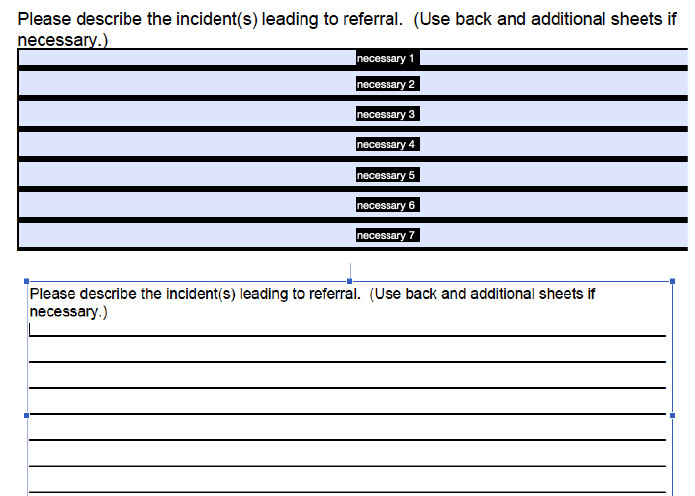
Step 14 - Editing text continued
Next, click within the text area where the lines are, and delete them all. This will raise the footer, but you can hit ‘Enter’ a few times to create your box space.
Now you have a blank space for a paragraph text box.

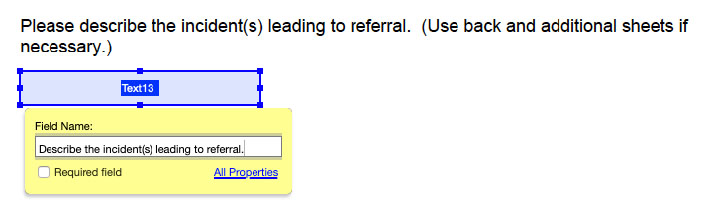
Step 15 - Adding a text box
Using the “Prepare Forms” toolbar, select the “Text Box” option, circled, to create the text box we’ll use for the form entry.

Step 16 - Adding a text box continued
It will drop in the same way the check boxes did. Be sure to give your field an adequate name.
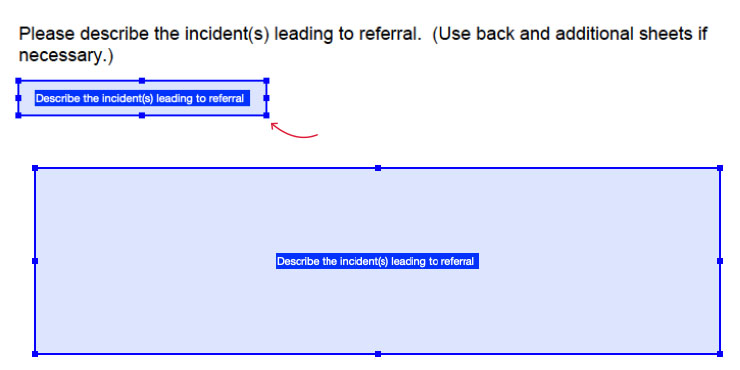
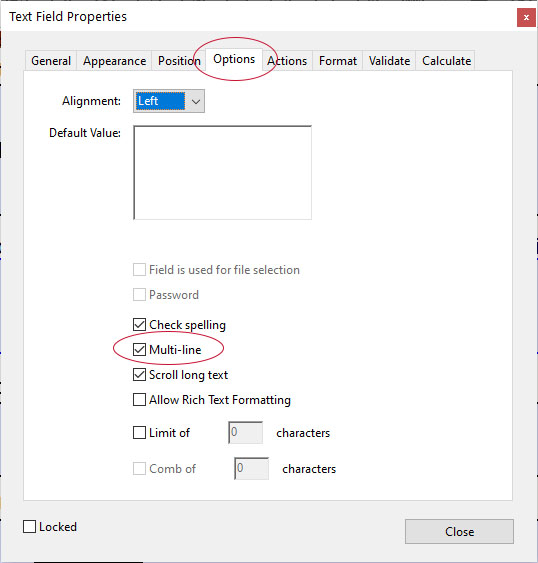
Step 17 - Resizing the text box
To make this box bigger, click and drag on of the dots (handles) and pull it to an appropriate size.
Once you have made the box the size you need or want, right click to open the "Properties" dialog and select the "Options" tab, then check the "Multi-line" box.
And done!
Our form is now complete with properly named fields, the appropriate fields used in the correct places, and our field lists in the right order. You can now save this form and use it online.
Cape Girardeau, MO 63701